

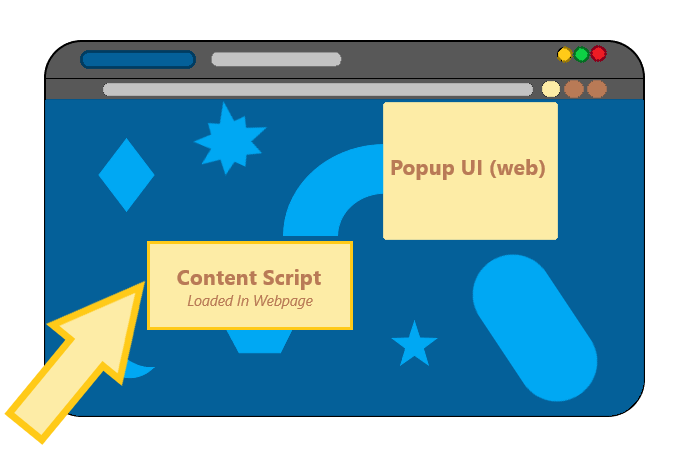
The flow of data within our browser extensions is a vital part in creating any incredible and useful tool. In this article we hope to show you how data can moves within the different parts of the extension.
So far, in the articles we’ve written prior, we’ve covered that there are 3 major parts of a chrome extensions. Popup, content scripts and background scripts. All these parts can work independently, moreover, you can have a fully functioning chrome extension with just one of these.
To communicate to the different parts of the extensions we will use the chrome.runtime API and/or chrome.tabs.sendMessage.
The chrome.runtime API retrieves the service worker, returns details about the manifest, and listens for and responds to events in the extension lifecycle. You can also use this API to convert the relative path of URLs to fully-qualified URLs (we’ll look at that in the article for web accessibility). No permissions are need for this API. (We will cover permissions in our next article).
As for the chrome.tabs API will look at it in length in a future article but for now there are 2 main function/methods will use for communication chrome.tabs.query and chrome.tabs.sendMessage
Setup Sample Chrome Extension Project
If you already have a chrome extension project, great! If not, then create a folder/director and have the following files in there;
- index.html
- styles.css
- scripts.js
- background.js
- content.js
- manifest.json
index.html , styles.css and scripts.js are going to be used for the UI and functionality of the popup of the extension respectively. content.js and background.js will be used as the content script and background script respectively.
Extension Details — Manifest.json
You’ll notice that there is a new field permissions . We’ll cover this at length in the next article, but briefly, it just tells chrome browser that the extension will be using functions from the chrome.tabs API chrome.tabs.query and chrome.tabs.sendMessage, to get the tabs info and to send data to those tabs where the content scripts are running.
Note: You cannot send data to content scripts using
chrome.runtime.sendMessage
{
    "name": "Web Color Changer",
    "short_name": "Web Color Changer",
    "version": "1.0.0.0",
    "description": "Change the background color of any website",
    "manifest_version": 3,
    "permissions": [
        "tabs"
    ],
    "action": {
        "default_popup": "index.html",
        "default_title": "Web Color Changer Popup"
    },
    "background": {
        "service_worker": "background.js",
        "type": "module"
    },
    "content_scripts": [
        {
            "matches": [
                "<all_urls>"
            ],
            "js": [
                "content.js"
            ]
        }
    ]
}
Extension Popup UI — index.html and styles.css
<!DOCTYPE html>
<html lang="en">

<head>
    <meta charset="UTF-8">
    <meta name="viewport" content="width=device-width, initial-scale=1.0">
    <title>Hello World</title>
    <link type="text/css" rel="stylesheet" href="./styles.css">
</head>

<body>
    <h1>Web Color Changer</h1>
    <input type="color" />
    <button>Change </button>
    <script type="text/javascript" src="./scripts.js"></script>
</body>

</html>
body {
    width: 200px;
    height: 300px;
    display: flex;
    flex-direction: column;
    justify-content: center;
    background: linear-gradient(#ffffff, #ded4e0);
    color: #9703c4;
    margin: 0 auto;
    text-align: center;
    padding: 0px 30px;
}

input {
    width: 100%;
}

button {
    margin: 10px;
    background: #47015c;
    padding: 10px 0px;
    border: none;
    border-radius: 10px;
    box-shadow: rgba(0, 0, 0, 0.35) 0px 5px 15px;
    color: white;
    font-weight: 700;
    cursor: pointer;
    transition: 0.4s all;
}

button:hover {
    background: #9703c4;
    border-radius: 30px;
    box-shadow: rgb(38, 57, 77) 0px 20px 30px -10px;
}
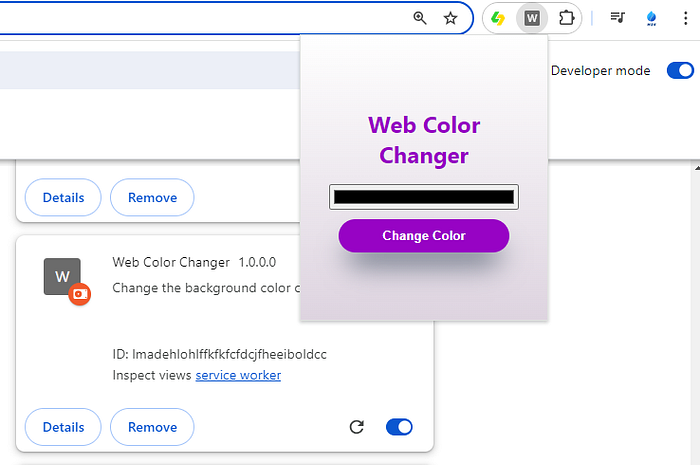
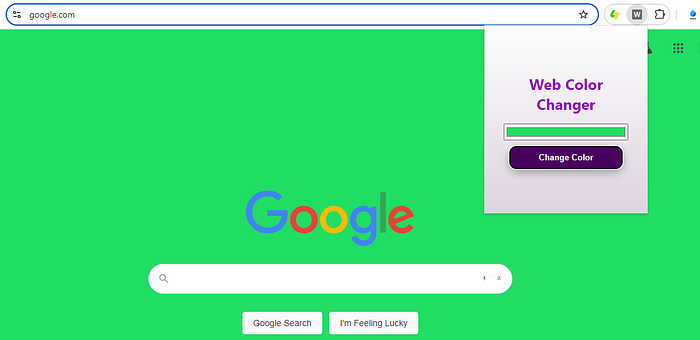
When you install your extension locally it should look something like this.
Popup Functionality — Scripts.js
Now we are going to code the popup’s functionality. The idea is that the extension should automatically detect background color of the current webpage and change the input color accordingly. In addition, when a user clicks the Change Color button it should change the background color of the website to the color selected by the input color.
That is where chrome.runtime API because useful. The API has two major function/methods for handline in-app communication
chrome.runtime.sendMessage(data_you_want_send) and
chrome.runtime.onMessage.addListener((request, sender, sendResponse) => {})
both of which you are look at the official documentation by Google on it here. A sender and listener, respectively.
// get active tab
chrome.tabs.query({ active: true }, (tabs) => {
    if (tabs[0].url) {
        //send to content scripts to get the color
        chrome.tabs.sendMessage(tabs[0].id, { action: "get-color" });
    }
});


// listen for message coming from background script (background.js) or content script (content.js)
chrome.runtime.onMessage.addListener((request, sender, sendResponse) => {

    // change the color of the input to make the website as a default
    if (request.action === "web-color") {
        const color = request.color;
        const inputcolor = document.querySelector('input');
        if (color.includes("#")) {
            inputcolor.value = color;
        } else {
            // convert rgb e.g rgb(216, 19, 19) to #d81313
            // const values = color
            //     .replace("(", "")
            //     .replace(")", "")
            //     .replace("rgb", "")
            //     .split(",")
            // const [r, g, b] = values;
        }
    }
});


// send color to the content scripts
document.querySelector('button').onclick = () => {
    const inputcolor = document.querySelector('input');
    const color = inputcolor.value;

    // you can send numbers, strings, arrays, and objects
    // send background scripts background.js
    chrome.runtime.sendMessage({ action: "change-color", color: color });

    // get active tab
    chrome.tabs.query({ active: true }, (tabs) => {
        if (tabs[0].url) {
            //send message to content scripts to change color
            chrome.tabs.sendMessage(tabs[0].id, { action: "change-color", color: color })
        }
    });
}
If you want to implement the same in React JS you would do something like this in your App.jsx file for example.
/* eslint-disable no-unused-vars */
/*global chrome*/


import { useEffect, useState } from 'react'

function App() {

  const [color, setColor] = useState("#000000");

  useEffect(() => {

    // get active tab
    chrome.tabs.query({ active: true }, (tabs) => {
      if (tabs[0].url) {
        //send to content scripts to get the color
        chrome.tabs.sendMessage(tabs[0].id, { action: "get-color" });
      }
    });

    const listener = (request, sender, sendResponse) => {
      // change the color of the input to make the website as a default
      if (request.action === "web-color") {
        const color = request.color;
        const inputcolor = document.querySelector('input');
        if (color.includes("#")) {
          setColor(color);
        } else {
          // convert rgb e.g rgb(216, 19, 19) to #d81313
          // const values = color
          //     .replace("(", "")
          //     .replace(")", "")
          //     .replace("rgb", "")
          //     .split(",")
          // const [r, g, b] = values;
        }
      }
    };
    chrome.runtime.onMessage.addListener(listener);
    return () => chrome.runtime.onMessage.removeListener(listener);
  }, []);


  const onChangeColor = () => {
    const inputcolor = document.querySelector('input');
    const color = inputcolor.value;

    // you can send numbers, strings, arrays, and objects
    // send background scripts background.js
    chrome.runtime.sendMessage({ action: "change-color", color: color });

    // get active tab
    chrome.tabs.query({ active: true }, (tabs) => {
      if (tabs[0].url) {
        //send to content scripts
        chrome.tabs.sendMessage(tabs[0].id, { action: "change-color", color: color })
      }
    });
  }

  return (
    <>
      <h1>Web Color Changer</h1>
      <input value={color} onChange={(e) => setColor(e.target.value)} type="color" />
      <button onClick={onChangeColor}>Change Color</button>
    </>
  )
}

export default App
Change the website color — Content Scripts content.js
Here is where the website’s background color changing is happening. The content script listens for messages coming from the popup or background script and send a message back after perform an action.
// listening for messages from background script or popup
chrome.runtime.onMessage.addListener((request, sender, sendResponse) => {

    // listening for message from the scripts.js (Popup) to get the color
    if (request.action == "get-color") {
        const color = document.body.style.background;

        // sending the color to the popup and background.js (It sends to both)
        chrome.runtime.sendMessage({ action: "web-color", color: color })
    }

    // listening for message from the Popup (scripts.js) to change color
    else if (request.action == "change-color") {
        const color = request.color;
        document.body.style.background = color;

    }

});
When the content script sends a message, the popup and background script receive the data simultaneously. If the popup is NOT open then only background script will receive the message.
Background Script background.js
For this extension, we are just logging the message sent in the background scripts background.js
chrome.runtime.onMessage.addListener((request, sender, sendResponse) => {

    // listening for message from the scripts.js (Popup) to get the color
    if (request.action == "get-color") {

        // send to all content scripts
        chrome.runtime.sendMessage({ action: "get-color" });
    }
});
Web Color Changer Extension
If you’ve gotten to this point then we are done! You have yourself a amazing, incredible, awesome, fantabulous, game-changing background-color-changer chrome browser extension. Change the colors of any website to your liking.
You can find the source code for the normal HTML, CSS and JavaScript implementation here or for React JS here
Bonus Tip
Chrome extension are able to communicate with other chrome extensions.