

Hey there, you might be wondering, “why not just ask Chat GPT on how to build chrome extensions?” Well firstly your sound logic isn’t welcomed here. But on a more serious note; as of writing this article today if you do ask ChatGPT on how to build chrome extension it will give you details on manifest version 2, which was discontinued by Google for manifest version 3. So this article aims to keep you update to date on how to build chrome extensions with the vanilla HTML, CSS and JavaScript for manifest v3, up until AI reads this article, steals my jokes and updates its knowledge base. Then I’m in trouble! But until then, keep reading.
I am under the assumption that you know what chrome extensions are and/or have used one before. If you have no idea what chrome extensions are, that’s great! I can flex my knowledge on the topic and look like an absolute genius. However, if you know what chrome extension are you can skip this section (1 — Prerequisites) in the article.
What are chrome extension?
Imagine your web browser is like a plain cheese pizza. It’s tasty and gets the job done, but sometimes, you crave a little something extra. Enter Chrome extensions — the delightful toppings that turn your simple cheese pizza into a gourmet feast!
Why chrome extensions are useful?
1 Enhanced Productivity and Efficiency: Chrome extensions can significantly boost productivity by automating repetitive tasks, providing quick access to essential tools, and streamlining workflows. For instance, extensions like Grammarly assist with writing, while tools like LastPass manage passwords securely, saving users time and effort in their daily activities.
2 Customized Browsing Experience: Chrome extensions allow users to tailor their browsing experience to their specific needs and preferences. Whether it’s blocking ads with extensions like AdBlock, enhancing privacy with tools like Ghostery, saving your links like Lindle (#shamelessplug) or customizing the appearance of web pages with Stylish, users can personalize their browser to suit their unique requirements.
3 Extended Functionality: Extensions can add new features and capabilities to the browser that are not available by default. For example, extensions like Evernote Web Clipper enable users to save web content directly to their Evernote account, while Lindle allows users to save articles and videos for later viewing. These added functionalities enhance the overall utility of the Chrome browser, making it a more powerful tool for various tasks.
Where to get them?
You can head over to the chrome store to install your extensions.
1 — Prerequisites
1.1 — Programming Understanding
Well first off, you need a basic understanding of how HTML, CSS and JavaScript work together to make a web page. There are great resources on how to learn do just that; W3Schools, YouTube Tutorials. Just don’t go overboard with it, we need you to still comeback and read this article.
1.2 — Code Editor
Next, you need a code editor, anything you can use to write and edit your code. You can use editors like Visual Studio Code (the blue one), Sublime Text, Neo Vim, Netbeans, Eclipse, Emacs, Webstorm, Dreamweaver, Notepad++, a pen and paper… The point is you need something to write and edit your code on your computer (I was joking about the pen and paper, don’t do that). There are also great tutorials and resources to guide you started on how to install each them on your computer.
1.3 — Chromium Browser
You need to chromium based browser. What that means is that you need a browser like Chrome or any other browser based off of chrome; Brave
1.4 — Willingness to Learn
This goes without saying, you will fail, a lot! You will struggle, and sometimes you will feel like giving up. But perseverance is the key to upgrading oneself. Alright, with that being said let’s do this!
2 — Setting up your Project
I will be using the VS Code editor in this article since it seems to be the most familiar with developers.
All of you Vim users can still follow along though, you’re already used to difficulty.
File Structure
Open your VS Code and create 5 files
- index.html
- styles.css
- scripts.js
- content.js
- manifest.json

3 — Coding the Extension
3.1 — Popup UI HTML — index.html
<!DOCTYPE html>
<html lang="en">

<head>
    <meta charset="UTF-8">
    <meta name="viewport" content="width=device-width, initial-scale=1.0">
    <title>Hello World</title>
    <link type="text/css" rel="stylesheet" href="./styles.css">
</head>

<body>
    <h1>Hello World Extension</h1>
    <button>Click Me</button>
    <script type="text/javascript" src="./scripts.js"></script>
</body>

</html>
3.2 — Popup Style CSS — style.css
This isn’t a UI/UX article, so the css it going to be very basic just to get you going. The most important part is to define the width and height. If you do not, your extension popup’s size will be inconsistent and will adjust itself according to the content in the popup. You can remove the width and height code and see what happens.
body {
    /* Size of the popup extension  */
    width: 400px;
    height: 400px;

    /* Style content of the popup */
    padding: 20px;
    margin: 0 auto;
    display: flex;
    flex-direction: column;
    justify-content: center;
}

button {
    border-radius: 30px;
}
3.3 — Popup Functionality — scripts.js
// find the button in the index.html
// setup a onclick event for the button
// display a popup saying hello world when clicked
document.querySelector('button').onclick = function (e) {
    // show alert
    alert("Hello World!");
}
3.4 — Chrome Extension — manifest.json
Everything up until this point is what you would do for a normal website or webpage. The manifest is a file that tells chrome that this is a chrome extension. The file tells chrome to run our scripts on any website.
{
    "name": "Hello World",
    "short_name": "Hello World",
    "version": "1.0.0.0",
    "description": "Hello World my very first extension",
    "manifest_version": 3,
    "action": {
        "default_popup": "index.html",
        "default_title": "Hello World Popup"
    },
    "content_scripts": [
        {
            "matches": [
                "<all_urls>"
            ],
            "js": [
                "content.js"
            ]
        }
    ]
}
3.5 — Chrome Extension Functionality — content.js
Now here is the fun part. We have already write the code in the manifest.json for the content.js file to write on any webpage. The content.js file is a content scripts you can read more about it from the official documentation. Brief it is a way to run you JavaScript code on other people’s websites. Our extension will try to make the background of any website gold.
// change the website body background to a different color
// you can use rgb(255, 215, 0)
// you can use hexcolor #ffd700
document.body.style.background = 'gold';
4 — Installing your chrome extension
4.1 —Setting up chrome
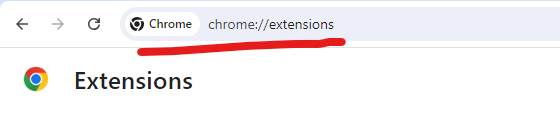
First you need to go to the extension dashboard or you can type chrome://extensions in the url bar.
An alternative is navigating there with the option menu.
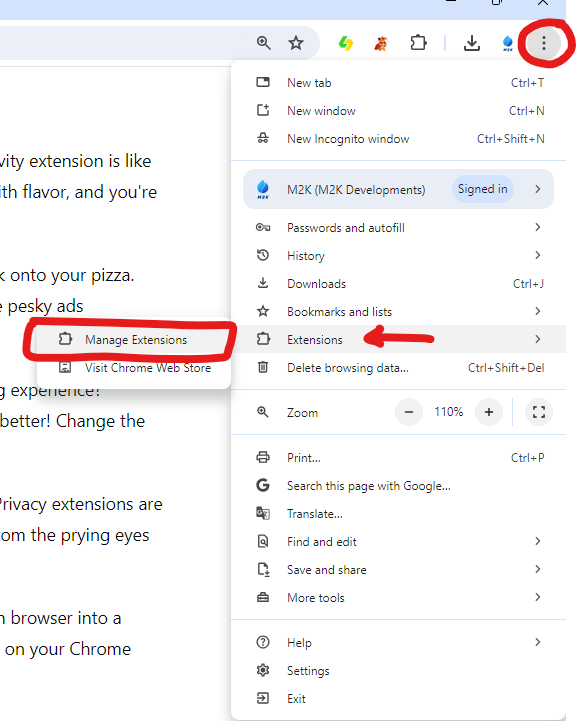
To your top-right you will see a toggle button for Developer Mode make sure that is on.

4.2— Adding your extension to chrome
To you top-left you will see a button that say Load unpacked.

When you click that button should the folder where you extension code is in.
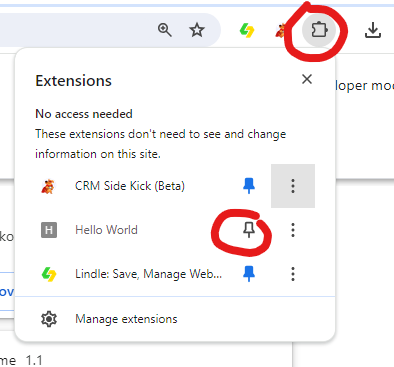
4.3— Pinning the Extension
To pin the extension on the app bar, click the puzzle icon and then the pin icon extension to the your extension name.
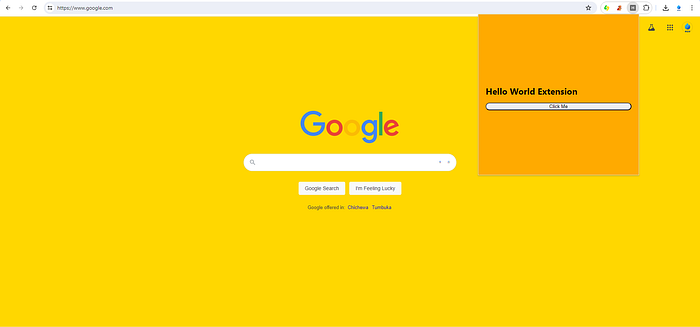
4.4 — Final Result
That’s it your all done! As you final result you should have something that looks like this.
If you did not get this result, wow you really messed up. Usually it is just spelling mistakes, so just check your files and code.
5 Final Thoughts
There you have it your first chrome extension. Its something alright. You can leave a comment a on how horrible UI of the extension is. I hope you found this article useful, until next time.